We had another round of Firecracker Shrimp this evening; however, I got a wee bit carried away and added far too much caJun ScRuNcH to the dish. A little here. A little there. A little...oops. There goes half the bottle. It gave the sauce a brilliant color, but when we sat down to eat it, the heat was almost intolerable--even for me.
If spicy food can cause such discomfort, why do we eat it?
Apparently, it's because we're germophobes. According to Paul Sherman, a professor of neurobiology and behavior, spices can kill or inhibit the growth of food-borne pathogens and parasites. And because food-borne pathogens and parasites are more prolific in warmer climates, those who live closer to the Equator tend to prefer spicer foods. The hotter the dish, the less likely we are to suffer at either end the next day.
Now you know! Mystery solved. I think we'll all sleep better tonight, don't you?
Thanks for 'Cooking At Home'!

Friday, February 11, 2011
Wednesday, February 9, 2011
Firecracker Shrimp with Roasted Garlic

Those who know me best know that I love heat. The spicier, the better. A recent excursion to Greensboro included dinner at Saigon, a Vietnamese restaurant. A footnote on their menu suggested that some of their entrees could be made-to-order--"Medium, Spicy, or Kamikaze." When I inquired about the intensity of each, the waitress assured me that "Spicy" was indeed----well, spicy. "Kamikaze," however, was best described as: "The chef, he likes to hurt people." Slightly intimidated, I ordered my entree "Spicy."
I should have taken my chances with "Kamikaze."
I enjoy spicy food that much. I really do, which is why caJuN ScRuNcH has taken such a predominant role in my cooking lately--not only is it really that good, it also packs a fiery punch. And it was perfect for last night's Firecracker Shrimp with Roasted Garlic.
This is a perfect blend of spicy and savory, and when paired with something cool and crisp, like a Caesar Salad, it makes for a very satisfying meal. Plus, there's a lot of room to play around with this recipe. So, experiment! Let me know what you add to the recipe. I'd love to feature it here.
Until then, thanks for 'Cooking At Home'!
Firecracker Shrimp with Roasted Garlic
Inspired by E-Mealz.com
Prep: 10 minutes | Cook: 35 minutes | Servings: 4-6
Ingredients
1 garlic bulb
1 teaspoon olive oil
1 1/2 lbs. shrimp, thawed, peeled and deveined
3 tablespoons caJun ScRuNcH
1/4 teaspoon salt
1/4 teaspoon pepper
2 tablespoons olive oil
1 teaspoon minced garlic
3 tablespoons minced onion
1 cup half and half
3 tablespoons lemon juice
Angel hair or thin spaghetti
Directions
Pre-heat your oven to 425 degrees. Cut 1/4" off the top of the garlic bulb so that most cloves are exposed. Peel off the first layer of skin from the bulb. Place bulb cut side up in a muffin tin. Drizzle with olive oil and cover with aluminum foil. Roast for 25-35 minutes, or until the bulb are soft.
Meanwhile, prepare angel hair according to package directions.
In a medium bowl, combine the caJun ScRuNcH, salt, and pepper. Add the uncooked shrimp and gently toss to coat the shrimp in seasoning.
In a skillet, heat olive oil over medium-high heat. Add shrimp. Cook for 3 minutes, or until pink and no longer translucent. Add minced garlic and onion and saute for 1 minute. Add cream and cook for 2-5 minutes. Stir in lemon juice. Slice roasted garlic bulbs. Reduce heat on shrimp and add sliced roasted garlic. Allow to simmer and thick.
Serve shrimp over cooked pasta.
Monday, February 7, 2011
Secret Ingredient: caJun ScRuNcH

I cook by the book. Some may criticize me for it. A lack of culinary instinct. I am in awe of chefs who can create--out of thin air--a delicious, one-of-a-kind recipe. The kind that takes their family by storm, and then the food world soon after. I'm just not one of those people. I like simplicity. I crave convenience. And above all--I can't afford too many culinary experiments-gone-wrong.
So, I'm always on the prowl for a secret ingredient--something that will take the flavor of my home cooking up a notch. And to that end, I have a new love--caJun ScRuNcH.
I will admit that when I first came across the recipe, I was considerably intimidated, especially when it didn't have familiar measurements like teaspoon or tablespoon, but instead--it was all about "parts." 2.5 parts of paprika to 1.5 parts of garlic powder to 1 part dried oregano, etc., etc. etc.
Luckily, a bottle of caJun ScRuNcH found its way into my home at Christmas. And despite promptly disappearing for two months, thanks to the curious hands of my toddler, it resurfaced last weekend.
It was worth the wait. It's a perfect balance of flavor and heat. I've used it with great success as a spice rub, a headliner in homemade chicken tenders, and as the final touch in a pasta sauce. For now, it's my secret ingredient and I encourage you to make it yours, too.
Let's spice things up while 'Cooking At Home'!

caJun ScRuNcH
By Josh Day
2.5 parts paprika (ie 2.5 tablespoons if using tablespoons, or 2.5 cups if using cups)
1.5 part garlic powder
1 part dried oregano
1 part dried thyme
1 part black pepper
1 part onion powder
1 part cayenne pepper
.5 part garlic salt
Mix all ingredients until well blended. According to Josh, if your "parts" are tablespoons, this will fill a 4 oz. spice bottle.
Sunday, February 6, 2011
The Bread Memories Are Made Of

There is no place like home, and there is no smell more wonderful than fresh-baked bread. I love how the smell of bread baking in the oven permeates every room of the house. It's a smell that favorite memories are made of. And we're making a lot of memories in our house these days.
The key ingredient in any bread recipe is yeast. Working with yeast can be very intimidating. There's a reason why I frequently refer to yeast as "yeasty beasties."
Yeast is living--and tempermental. Put it in water that's too cold, it won't activate. Put it in water that's too hot, it will die. But find that middle ground, and magic happens.
Are you ready to see the sparks fly?

The players in this masterpiece are few--water, yeast, flour, sugar, salt, and butter. Specifically, this recipe requires warm water--again, not to hot or too cold. My best advice is to err on the side of lukewarm. If it's warm enough that you could fill a bathtub with it and get in comfortably, it's just about right.

Pour 1/2 c. warm water into your mixing bowl. Add the yeast. You may see the yeast immediately begin activating--look for the "wrinkles" along side the edges of the bowl.

Add sugar and whisk to blend.

Let the mixture rest for about 5 minutes, until the mixture begins to take on creamy characteristics.

Add the remaining 2 c. of warm water to the yeast mixture, and begin to mix with the dough hook attachment on your stand-up mixer. If you don't have one, let's get back to basics and knead.

Gradually add 3 1/2 c. of flour to the yeast mixture. If necessary, stop your mixer and scrape down the sides of the bowl repeatedly, until the dough begins to form.

Keep mixing (or kneading, for those who care more about their upper arm fitness than I), and gradually add the remaining flour. The more you mix, the smoother your dough will become.

Get second opinions, if necessary.

When your dough appears to be thoroughly mixed, add the salt, and then throw in the butter, one tablespoon at a time. Don't be alarmed if your dough begins to fall apart. With more mixing, it will come back together.

Before pulling your dough out to be shaped, test it. Is it too sticky? Add small amounts of flour and continue to mix. It is too crumbly? Add small amount of water and continue to mix. Ideally, you'll be able to handle this dough without leaving half of it behind on your fingers. It may take some patience getting it to the right texture, but patience pays off here--trust me.

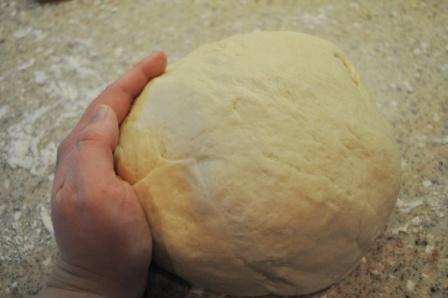
Throw the dough out onto a lightly floured surface and shape it into a ball. This shouldn't take more than 20 seconds--you don't want to handle the dough too much at this point.

Place the dough in an airtight containter coated with vegetable spray. Turn the dough over several times so that it's covered in vegetable spray on all sides. Seal the container and walk away. Fold the laundry that's piled in the corner, or do what I do, pretend to fold the laundry that's piled in the corner.

After 45 minutes to 1 hour, your dough will have at least doubled in size. Sometimes I'll let it go even longer--the greater the rise, the airier the final loaf will be.

Punch down the down the dough and turn it out on to a lightly floured surface. Try to use a gentle touch, but if you can't resist otherwise, I promise I won't tell.

Because this recipe makes two 1 1/2 lb. loaves, divide the dough in half and then work one half at a time. Using your fingers or a rolling pin, flatten the dough into a 13" x 9" rectangle. Fold 1/3 of the dough over on itself.

Bring up the remaining third on top--not unlike folding a letter. At this point, you could turn the dough over and drop it in a loaf pan, but we're aiming for slightly more professional results.

To get rid of "seams" in your dough, pinch all seams together.

Place the loaf seam-side down in a greased loaf pan. Cover loosely with plastic wrap coated with vegetable spray, and walk away again. This is one of the reasons I love this recipe--it's a mostly hands-off recipe. Yeast works for you!

After another 45 minutes to 1 hour, your loaf will have risen above the top of the pan. Remove the plastic wrap and lightly poke your the dough with your finger. If the indentation remains, it's ready to bake.

After 35 to 45 minutes in a 375 degree oven, your dough will have transformed into this tall, golden loaf that will be as wonderful to look at it as it will be to eat. It's toothsome, but airy. It's wonderful as toast, french toast, sandwich bread, french bread, buschetta, and more. In our house, we love it lightly toasted with honey, or--my personal favorite--piled high with our favorite bruschetta toppings. No matter what you do with this bread, you won't regret it.
As always, thank you for 'Cooking At Home'!
White Loaf Bread
From Baking with Julia by Dorie Greenspan and Julia Child (1996)
Prep Time: 2+ hours | Bake Time: 45 minutes | Makes two 1 1/2-lb. loaves
Ingredients
2 1/2 c. warm water
1 tablespoons dry active yeast (I prefer Red SAF yeast, but any variety will do.)
1 tablespoon sugar
7 c. all-purpose flour
1 tablespoon salt
4 tablespoons unsalted butter, at room temperature (1/2 stick)
Directions
Add 1/2 c. warm water to your stand-up mixer mixing bowl. Add yeast and sugar. Whisk together. Let the yeast mixture rest for 5 minutes, until it turns creamy. Add the remaining 2 c. water.
With the dough hook attached to your stand-up mixer, begin to mix the yeast mixture. Gradually add 3 1/2 c. of flour and mix until the dough begins to come together. If necessary, stop the mixer and scrape down the sides of the bowl with a spatula. Repeat with the remaining 3 1/2 c. of flour. Add the salt and mix until incorporated. Add the butter, one tablespoon at a time, mixing well after each addition.
Turn the dough out on a lightly floured surface and shape it into a ball. Place the dough into an air-tight container that's been sprayed with vegetable spray. Turn the dough over until all sides are greased. Close the container and allow to rise for 45 minutes to 1 hour or until the dough doubles in size.
Turn the dough out on a lightly floured surface and divide in half. Working one half at a time, flatten the dough into a 9" x 13" rectangle. Treating the dough a letter needing to be folded to mail, turn 2/3 of the dough over on itself. Fold the remaining 1/3 on top. Pinch together middle and end seams together.
Place dough seam-side down in a greased loaf pan. Cover lightly with plastic wrap that has been sprayed with vegetable spray and allow to rise 45 minutes to 1 hour, or until the dough has risen above the top of the pan.
Remove the pan and bake in a 375-degree oven for 35 to 45 minutes. Immediately remove the loaf from the pan and allow to cool completely on a wire rack. This loaf is unforgettable when served still slightly warm.
Wednesday, February 2, 2011
Why My Kitchen Is Illegal
Many years ago, I learned that the road less traveled was often the better one, even if the journey is bound to be rough. And starting a business is no exception.
Yes, illegal. It doesn't even need to be inspected. We have two major violations that simply cannot be ignored.

Suddenly, I'm kitchenless.
I've begun searching for a local, legal kitchen which I can rent once a week for meal preparation, but leads are few and far between.
There are many things I want Cooking At Home to be: informative, inspiring, and--legal.
Initial response to yesterday's announcement has been overwhelmingly positive and while I'm eager to begin receiving orders, a bit of legal research this evening revealed that I can't. Not yet.
Because....
My kitchen is illegal.
Yes, illegal. It doesn't even need to be inspected. We have two major violations that simply cannot be ignored.
Their names are Darby and Chutney. Sadly, the third in this picture--Lily--recently passed away. Yes, indoor pets make your kitchen illegal.
Suddenly, I'm kitchenless.
I've begun searching for a local, legal kitchen which I can rent once a week for meal preparation, but leads are few and far between.
But fear not! While I search for some great kitchen space--stainlesss steel, here I come!--I am moving forward and beginning to schedule private, in-home cooking classes.
Cooking At (Your) Home offers home cooks of all skill levels the unique experience of learning a new recipe, skill, or technique in the comfort of your own kitchen. Delicious recipes. Fresh ingredients. And a great opportunity to make mealtime memorable again, whether it's an intimate dinner for two, a girls' night in, or a unique one-on-one experience designed to take your home cooking to the next level.
And remember, what happens in the kitchen stays in the kitchen! Look for this month's "menu" of classes soon.
In the meantime, thank you for 'Cooking At Home'!
Tuesday, February 1, 2011
Too Many Ideas!
I know. I know.
"Where is the bread recipe?"
I know.
The simple answer is this. I've been ruminating. Lately, I've had several inspiring ideas for not only this blog, but the Cooking At Home brand, and while I attempt to find a balance between work-life-work, the bread recipe will have to wait. It's photographed--and quite lovely--but nevertheless, it's not ready.
So what are these ideas, you ask? Many things. An e-book. A very special cookbook. And what I'm most excited about--a home delivery service.
The truth is that I love cooking and baking far more than I do writing about it. Few things make me happier than donning my apron and flipping on my under-cabinet lighting (a ritual I have when things are about to get messy).
This month, I'm unveiling a brand new menu with select items available for advanced ordering. A sampling of my favorite things--savory and sweet--made fresh, with simple ingredients, and always delivered. This menu will be tested in select neighborhoods and businesses in the Shelby, NC, area. And I hope I make it to your neighborhood soon!
While I put the finishing touches on the menu, and fine tune the logistics behind it, I invite you to check out my favorite online recipe collection--www.tastykitchen.com. It is my go-to resource when the tried and true recipes in my own collection need a little spicing up.
It was created by one of my favorite bloggers (and home cooks!), Ree Drummond, otherwise known as "Pioneer Woman." While only online for just over a year, it has exploded with user-submitted content at a breakneck pace. Add your own, or do what I do--drool. A lot.
Until then, thank you for 'Cooking At Home'!
Wednesday, January 26, 2011
Diabetic Friendly Banana Nut Bread

I made a Greek pasta salad this evening with egg noodles. It's been that kind of day. But my hands smell like garlic and butter, so all is right with the world. Before you ask, yes, Sara Lee was kicked to the curb this weekend by my baking two gorgeous bread loaves. The only reason why that recipe has not been shared yet is because it was only as I was pulling my loaves from the oven that I realized that I hadn't photographed a single step. And when yeast is involved, step-by-step photographs are very, very, very helpful.
But, onward and upward. We go through a lot of bananas in our home, or "bannies," as my toddler refers to them. But we were all a little slow to tackle the last bunch that made it home from the grocery store. Rather than toss these overripe beauties, I made banana bread. It's a winner everytime.

Here are the necessary players: butter, sugar, a lonely egg, vanilla, oat bran cereal, flour, baking powder, baking soda, salt, really, really, really ripe bananas, and walnuts.
With a recipe that prominently features fruit, it's almost like the ingredients are smiling back at you.
Because we have diabetic needs in mind, you could substitute the butter for lite margarine, and also use a sugar substitute. I use Splenda for this recipe, but there are several readily available options at your grocery store.

Oat bran cereal may be the hardest ingredient to find. It's always on the top shelf of the cereal aisle. Be sure to read the "fine print" and make sure you pick up oat bran. This gives the bread a great texture, in addition to adding a significant amount of fiber.

Mix together the flour, baking powder, baking soda, and salt.

Cream together the butter and sugar.

Add the one lonely egg and vanilla extract and mix well.

Realize that you still had your dough hook on your mixer from baking two very gorgeous, fluffy loaves of bread earlier in the day and switch it out for a more appropriate attachment. Ah, that's better.
Add the oat bran cereal and mix until combined.

Mash those really, really, really ripe bananas. There are many ways to mash bananas, but I took a short cut, threw them into the measuring cup and took a fork to them. That way I can measure as a mash. Or is it whistle while I work?

This can really be very therapeutic after a long day.

Add part of the flour mixture to the batter.

Add part of the mashed bananas to the batter. Continue alternating--flour--bananas--flour--bananas. Mix well after each addition. And smell this batter, too! Adding the bananas introduces a wonderful aroma.

Admire your well-mixed batter, or scrape down the side of the bowl, as needed, to ensure the batter is mixed well.

The last addition is some chopped walnuts. What is banana nut bread without the nuts, after all?

Pour the batter into a greased loaf pan and bake in a 350-degree oven.
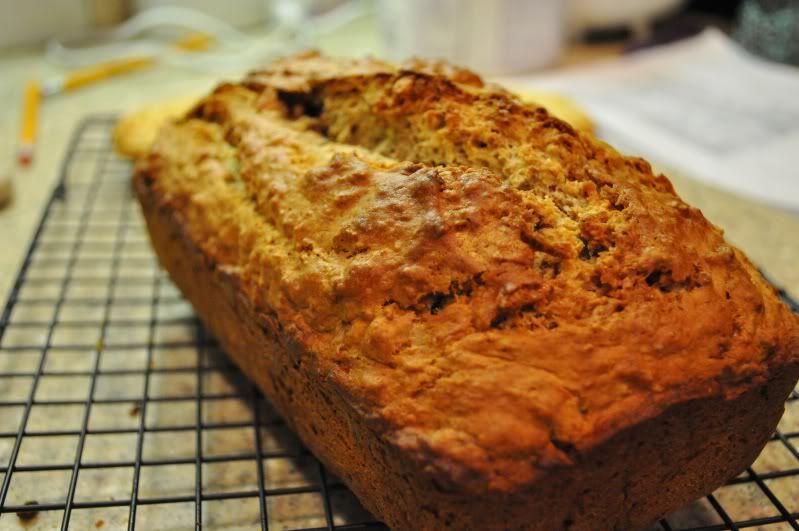
After 1 hour, you'll have a gorgeous loaf of banana nut bread. Remove it from the pan and allow it to cool on a cooling rack. This is great out of the oven, toasted, or even cold.
While I'm a huge fan of banana nut bread regardless of the recipe behind it, I really do enjoy making this from time to time because it is diabetic friendly, if appropriate substitutions are made. A diabetic diet is one of the healthiest ways to eat, and does not have to mean the elimination of all carbohydrates--savory or sweet--from the menu. In fact, I'm such a huge proponent of diabetic food principles that I have several diabetic cookbooks in my cupboard, a few of which I frequent often.
No matter your health preferences, you can't go wrong with this recipe.
Diabetic Friendly Banana Nut Bread
From the Type II Diabetes Cookbook
Prep: 20 minutes | Bake: 60 minutes | Servings: Depends on how you slice it
Ingredients
1/4 c. butter or lite margarine
1/2 c. sugar (up to 1/4 c. sugar substitute may be used)
1 egg
1 tsp. vanilla extract
1 c. oat bran cereal
1 1/2 c. flour
2 tsp. baking powder
1/2 tsp. baking soda
1/2 tsp. salt
1 1/2 c. mashed bananas
1/2 c. chopped walnuts
Instructions
Preheat your oven to 350-degrees.
Pour the batter into a greased loaf pan. Bake 60 minutes or until a toothpick inserted into the center comes out clean. Remove the bread from the pan and allow it to cook on a cooling rack.
Enjoy!
Friday, January 21, 2011
Better Than Sara Lee. Really!
I have a secret I am compelled to share with you. I bake my own bread. And it's really good. Still don't believe me? My husband loves my bread. And tonight he announced that--are you sitting?--my bread is better than Sara Lee. To understand the significance of this comment, you must understand that for the duration of our marriage, he has asked...no, insisted...no, demanded, that I buy classic Sara Lee white bread.
When Sara Lee unveiled its whole wheat white bread, I tried purchasing that instead, only to have my healthful concerns met with a lot of groaning. He swore it tasted different, although I couldn't tell the difference. I'm a whole wheat, high fiber kind of girl. White bread is white bread.
When I first started baking my own bread, my husband was doubtful. I don't blame him. However, he's since converted. It's a dense, soft, but toothsome loaf that is as beautiful to look at as it is delicious, especially as bruchetta topped with insalata pomodoro. When I gave away a loaf to my best friend, my husband was vocally dismayed. It was "his bread" after all.
Well, we ran out of homebaked bread. Sara Lee made it back into our kitchen once more.
And tonight, as we were making BLTs for dinner (I know, so not glamourous for a Friday night), I was complaining left and right about how thin the slices were, how they couldn't hold up to being buttered and grilled without collapsing like an over-roasted marshmellow. "My bread would have performed so much better than this," I exclaimed!
That's when it happened.
"Your bread is better than Sara Lee."
Victory!
So, in addition to recharging my camera battery, fresh baked bread is on this weekend's to-do list, with the recipe to follow soon. You'll be amazed at just how easy it is.
Wednesday, January 19, 2011
The Results of Torte-ure

I have good news and I have bad news.
The good news is that Dorie Greenspan's Fold-Over Pear Torte exceeded my greatest expectations. I think I swooned when I pulled it out of the oven. And was brought to tears when I pulled the torte from the pan to reveal the most beautiful "tall, golden, roly-poly dessert" that I've ever made.
The bad news is that I didn't get a picture of the torte out of the pan.
Or on the cake plate.
Or sliced.
Or with a dollop of the homemade whipped cream that I had beat into submission.
Because my camera took a swan dive--figuratively speaking, anyway.
And because I had but minutes before my guests arrived.
And because I arrived home to the chirping of an equally ill-fated smoke detector battery.
And because our cat left a hairball in the baby's room.
It was a rough evening. Thankfully, I was in the company of 14 sisters who think I can do no wrong.
The torte was perfect in every way. A decadent blend of pears, apricots, walnuts, and cream. And because the recipe is indeed two pages, single-spaced, and because I don't think any kitchen is complete without Dorie's cookbook, or any of her cookbooks, I am going to insist you buy it if you want the recipe.

No, really, it's the least I can do.
Monday, January 17, 2011
Fold-over Pear Torte-ure

By and large, I don't do well on less than three hours of sleep and will rarely subject myself to the torture that is functioning in normal society the day after. However, desperate times often call for desperate measures and so here I am waiting for my second Fold-Over Pear Torte of this long, long evening to come out of the oven.
This isn't just any pear torte. It's Dorie Greenspan's Fold-Over Pear Torte. This means that it will smell, look, and taste...perfect, even if the recipe is two pages long, single spaced, and without pictures.
Yes, I am baking a sight-unseen recipe which I plan to serve to 14 very special houseguests tomorrow evening. And it is only for them that I would subject myself to this torte-ure.
Will it live up to all that I imagine it to be? Only time will tell. And most of it will be spent ingesting as much caffeine as I can find.
Thursday, January 13, 2011
Derailed
Am I the only home cook whose passionate drives often get derailed by...well, life? While the holidays are usually marked by gluttony and overspending, ours were marked by sniffles, sneezes, and stomach flus.
Not exactly condusive to culinary genius.
Not that I am a culinary genius. Far from it, actually. I just love to cook. And I love sharing that passion with others, especially my daughter who went to bed tonight covered head to toe in a fine dusting of flour and well past her bedtime because we were baking bread and I know of no better reason to let the flour fly.
Cooking at home is a passion, because my family is a passion. I cook and bake and pile high dirty mixing bowls, measuring spoons, baking sheets, and skillets because at the end of the day, I want my family to eat well. But more than that, I want memories of family dinners to include tiny fingers zealously poking holes in pizza dough, teaspoons of garlic salt poured on the kitchen floor by unsteady little hands, my husband racing to open a nearby window because I burnt something...again, and sitting down together to eat a meal together that we prepared together.
Does it get any better than that?
I recently shared with someone that it was my desire to teach cooking classes, to which she responded, with great surprise, "You're good enough to teach classes?"
Considerably embarassed by this response, I stewed in a warm broth of self-doubt for several weeks. I contemplated abandoning the project, and tried convincing myself that no one in the South would want or need a cooking class. This is the stomping grounds of Paula Deen, afterall. Great cooking seems to be genetically programmed around here.
But you know what's missing? Passion. A desire to cook at home not just because it's healthier and economical, but because it's fun and messy and good. Really, really good. Especially when you do it with friends and family.
So no, I'm not good enough to teach classes. My technique is rough. My success rate is marginal. I'm far from neat, clean, and tidy when flour's involved. But I have a really good time in the kitchen and I firmly believe that you can, too.
Will you join me?
Subscribe to:
Comments (Atom)